Menus
This section of the manual describes the use of the menubar and the menus themselves. It then explains each entry in every Gnumeric menu, submenu or context menu.
- 4.2.1. Using Menus
- 4.2.2. Menubar
- 4.2.3. File Menu
- 4.2.4. Edit Menu
- 4.2.5. View Menu
- 4.2.6. Insert Menu
- 4.2.7. Format Menu
- 4.2.8. Tools Menu
- 4.2.9. Statistics Menu
- 4.2.10. Data Menu
- 4.2.11. Help Menu
4.2.1. Using Menus
A menu is a graphical element within a program which appears with a list of options. For instance, almost all applications have a menu through which the user can access the computer's filesystem to open or save their work. The main menus are on the menubar. The use of these menus is discussed in Section 4.2.2 ― Menubar.
Gnumeric also uses context menus to give users a quick way to access certain commands. The context menu will open up right under the mouse pointer when one of the secondary mouse buttons, usually the rightmost, is clicked. This menu is called a context menu because the entries in the menu are different depending on the location of the mouse pointer. The context menus are discussed in Section 4.3 ― Context Menus.
Both the main menus, on the menubar, and context menus may have submenus. A submenu is indicated by a small right-pointing arrow. To access a submenu, move the pointer down to the submenu entry. When the submenu opens, move the pointer directly across into the submenu. When there is not enough room to the right of the currently open menu, submenus may open to the left. Note that the submenu will close if the mouse pointer moves into any other menu entry.
You can also use the keyboard to navigate menus and submenus. See Section 4.2.2 ― Menubar to access the main menus using the keyboard. Once a menu is displayed, menu entries can be highlighted by pressing the down and up arrow keys. When a submenu opens, pressing the right arrow key moves the highlight to the first entry of the submenu. When a submenu entry is highlighted, pressing the left arrow key removes the highlight from the submenu. Pressing the space bar or the Enter key activates the highlighted menu entry.
Menu entries ending with an ellipsis (three dots) open a dialog window which asks for more choices.
4.2.2. Menubar
The default location of the menubar is at the top of the application window. The menus provide quick and organized access to all major commands such as opening files, saving files, printing and quitting the application.

To open a Gnumeric menu, click on the name of the menu in the menu bar. Once clicked, the menu will stay open. If the mouse pointer is moved to the name of another menu on the menubar, the first menu will close and the new menu open up. This is a useful way to look in each menu to hunt for a commands. Menus can also be opened through the keyboard. Pressing and holding the Alt key causes one of the letters in each menu name to be underlined. Press-and-hold Alt and press the underlined letter to open the associated menu. Using the keyboard for menu activation or navigation causes a letter of each menu or submenu item label to be underlined. Press that letter key to activate the menu item. Once a menu is open, the arrow keys can be used to move between menus or select an entry in a particular menu. To close an open menu, click over any other area of the application or of the desktop or press the Escape key, Esc.
Many menu entries are followed by a series of key names. These keys can be used to perform the menu action without having to open the menu. These are often combinations of keys involving the control key which is labeled as Ctrl, the shift key which is labeled Shift and the function keys which are labeled with an F and then a number. For example, to quickly cut a selection (accessible through the menu), the user can make a selection and then type the control key and the "x" key at the same time.
4.2.3. File Menu
The menu is the most important menu in Gnumeric because it gives the user the ability to interact with the computer operating system. This menu allows the user to create files containing all the work they have done. It also enables users to print the results of their work. Finally, the menu is the best way to close Gnumeric.
The menu choices are grouped into the following groups:
- 1 Workbook creation operations.
-
These menu items perform operations on files. Each item is presented below. File operations are critical and are therefore discussed in their own section latter in this manual in Chapter 14 ― Working with Files.
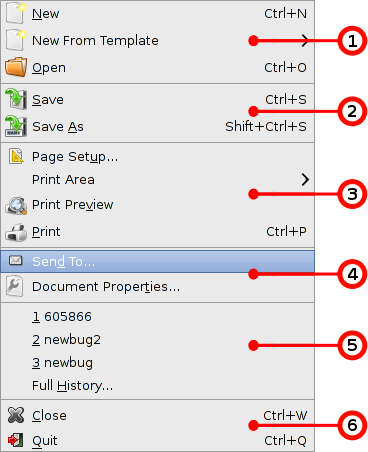
- — Create a new workbook. This opens a new workbook in a new window. By default the workbook will be named "Book1" or another number if there is already a worksheet with that name open. Note that the opened file has not yet been saved.
- — This menu item brings up a submenu from which a template can be selected. Rather than creating a new empty workbook, the template specifies some standard content. The new workbook is opened in a new window. The name named of the workbook is determined by the name of the template. Note that the opened file has not yet been saved.
- — The menu item opens the file chooser dialog to allow the user to pick an existing workbook for Gnumeric to open. Files in many different spreadsheet formats can be opened. To open files in a non-spreadsheet format, use the menu described in Section 4.2.10 ― Data Menu. See Section 14.2 ― File Formats for details. The menu item creates a new window containing the selected file. A more extensive discussion is presented in Section 14.3 ― Opening Files.
- 2 File creation operations.
-
- — The menu item saves the current worksheet. If the file has been named and saved before, this will silently save the file to the current filename. If it has not been saved before, this will act as if the menu item had been called and prompt the user for a filename.
- — The menu item allows users to save a file which has not yet been named to a named file. This is always used when a user saves a file which Gnumeric has named by default. This menu item can also be used to save a newly created file or to save an existing file to a new and different name. To export data from Gnumeric to a non-spreadsheet format, use the menu described in Section 4.2.10 ― Data Menu. For an explanation of the file formats which Gnumeric supports see Section 14.5 ― Saving Files.
- 3 Printing operations.
-
These menu items enable Gnumeric to print. Each item is presented below and printing issues are discussed fully in Chapter 15 ― Printing.
-
— The menu item call the Page Setup dialog. This dialog allows the user to set various printing options such as paper type, margin sizes and running header and footer formats. This dialog is explained in detail in Section 15.2 ― Page Setup..
-
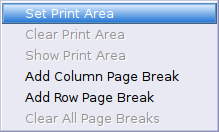
— The menu item opens the submenu shown in Figure 4-4. The items in this submenu allow the print area to be set, shown or cleared; and manual page breaks to be set or cleared. The print area of a sheet is that range of the sheet that should be printed. Items outside of the print area are usually omitted when printing. When printing Gnumeric will usually choose the appropriate page breaks. Manual page breaks can be used to force Gnumeric to insert a page break prematurely.
-
— The menu item allows a user to print one or all of the worksheets in a workbook. Gnumeric can send files directly to a printer or can print to PostScript or portable document format files. The Print dialog is explained further in Section 15.1 ― Printing to a Printer or a File..
-
— The menu item calls a dialog which presents the current workbook as it would be printed with the current Page Setup settings. The dialog also permits the user to print. This dialog is explained in Section 15.3 ― Print Preview.
-
- 4 Miscellaneous Operations.
-
- — The menu item call the Send To dialog. This dialog allows the user to send a Gnumeric workbook as an attachment to an email message. This dialog is explained in detail in Section 14.7 ― Sending Files.
- — The menu item calls the Document Properties dialog, a dialog with several tabs that allow many document specific settings to be adjusted. The dialog is described in detail in Chapter 12 ― Workbook Settings.
- 5 Recently used files.
-
- The first three menu entries in this section are shortcuts to re-open recently used files. The list will change dynamically as new workbooks are opened and created. Clicking on a file name listed here is the same as using the menu entry and finding the file in the Find File dialog. Note that if the file has been moved since Gnumeric last saved it, Gnumeric will not find the file. To access any recent file not listed, one can use the menu item below.
- — The menu item opens a dialog that shows all recently used files.
- 6 The Close and Quit operations.
-
These menu items either close the current worksheet, , or close all open worksheets, . Gnumeric will prompt the user with a Save Workbook.. dialog for any workbooks that have been changed since the last time they were opened or saved.
- — The menu item allows the user to close the current workbook. If this is the only workbook which this instance of Gnumeric has open, the close operation will also quit Gnumeric. If other workbooks are open, this workbook will close without affecting the others. If the workbook has unsaved changes, Gnumeric will ask the user if he wants to save the file.
- — The menu item will close all the workbooks currently being used by Gnumeric and quit the program. Gnumeric will prompt the user asking if he wants to save any workbooks which has changes which have not been saved.
4.2.4. Edit Menu
The menu is mostly used for operations on a worksheet or between worksheets. This menu gives users powerful editing operations such as the ability to undo recent changes, the ability to cut and paste selections of cells and the ability to search for specific cell contents.
The menu choices are grouped into the following groups:
- 1 Change History.
-
These menu items allow the user to remove recent changes to a worksheet or re-introduce changes which have been undone. These options give the user control over recent edits. This functionality is often called the "change history" of an application.
The type of edit has no importance. An edit which deletes the contents of a cell is treated in the same way as an edit which adds contents to a cell. The change history is session specific. The user will not be able to undo changes through the change history if the file is saved and then re-opened. Note also that the list only covers the last few dozen operations. The number of operations which Gnumeric tracks in its history depends on the size and complexity of those operations. You can customize this number using the preference facility described in Chapter 13 ― Configuring Gnumeric. There are a few unusual operations which are not yet tracked in this way.
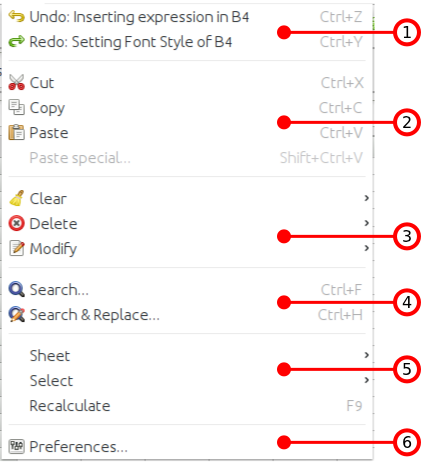
- — The menu item is used to remove the last few edits from a workbook. The edits must be undone in order. This menu item removes only the last edit from the workbook. The user can also access the undo list through one of the toolbar buttons and its associated menu. With this menu, the user can undo several operations at once. This is explained in section Section 4.4.2 ― The Standard Toolbar.
- — The menu item is used after an undo operation to restore the change that was undone. The menu item only restores the last undone operation. Users can also restore edit using a button on the standard toolbar and through the associated menu. The menu allows several operations to be redone at once. It is explained in Section 4.4.2 ― The Standard Toolbar.
- 2 Operations on selected areas.
-
These menu items enable selected cell contents to be moved around a spreadsheet, moved between worksheets or between workbooks. Selections are areas of the spreadsheet that have been chosen, usually with the mouse, and are usually colored pale blue. Selections are explained in greater detail in Section 5.6 ― Selecting Cells and Cell Ranges. Gnumeric currently only allows single range selections for these operations.
To use these menu items, the user must first select the range of the cut or copy area. When the user then picks these menu items, the contents of the selected areas will be entered into the Gnumeric clipboard and into the X clipboard. The contents of the Gnumeric clipboard can then be inserted into a new region of the spreadsheet, into another worksheet or into a new workbook. The X clipboard holds the space delimited results of each cell: either the text or the result of any calculation. The X clipboard can be pasted into any text area.
-
— The menu item is used to remove a selection from the selected area of a currently open workbook. When the menu item is chosen, the selected area will be outlined with a moving dotted line. This is the area which will be moved. The selection will only be removed after it is moved to the new location. Until then cut has not had an effect on the worksheet.
-
— The menu item allows a user to duplicate a selection. The original data remains where it was and the Gnumeric clipboard (and the X clipboard) has a copy which can be inserted elsewhere.
-
— The menu item is used to paste the contents of a selection which has been cut or copied. If the selection was cut, it is pasted into the new location unchanged. Cell references will not change in that they will still point to the same cells.
-
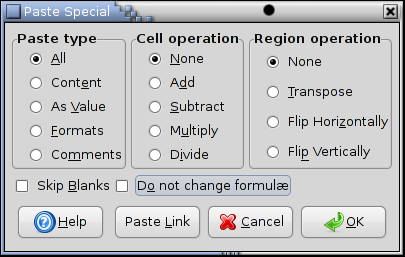
— The is used to paste a selection while altering certain characteristics. The menu item opens a dialog with three categories. The defaults make act as if it were the menu item.
The first set of choices allow the user to control the data pasted.The user can chose to limit the pasting to only the cell contents (no cell formatting is copied) or --- the opposite --- only cell formats copied (no contents). Furthermore, the user can insert the selection while transforming all the contents into values only. In this case, formulae will not be copied, only the results will be.
A second set of choices allows the user to perform simple mathematical transformations during the paste. The data in the cells being pasted into are modified by the cell contents. For instance, using the divide operation will result in each cell in the zone pasted into being divided by the equivalent cell which was copied originally.
The third set of choices allow the transposition or flip of the original selection. The transpose choice will change the selection by flipping it about the diagonal from top left to bottom right. Similarly, flip horizontally and flip vertically paste the selection accordingly.
The skip blanks check box prevents Gnumeric from taking any action for the cells in the selection that are blank. Normally Gnumeric will modify formulae that use relative addressing to cells outside the selection. The do not change formulae checkbox suppresses this change. (Note that references to cells within the selection are always preserved.)
-
- 3 Data entry and removal operations.
-
These operations add or remove data from the worksheet. They differ in the type of data modified or removed and the possible re-arrangement of remaining data, as explained below. With one exception noted below, these operations are like the previous group in acting based on the selected cells.
-
opens a submenu with eight choices, organized into two sets of four. The first group affects all cells in the selection. The second group applies the same actions to just the selected cells that are in rows selected by the filter. See Section 5.12 ― Filtering Data for details of setting up a filter.
Choose to clear all the elements of the cells in the selection: the formats and hyperlinks, the comments, and the contents. Choose to clear the formats and hyperlinks while leaving the data or formula in the cell intact. This removes any borders, re-sets the cell alignments, changes the background colour to white and the text colour to black, resets the number format to General, and removes the hyperlink associated with each cell, if any. Choose to delete the comments for the cells in the selection. Choose to leave the cell's formatting in place but remove the formula or data contents of the cell.
-
opens a submenu with five choices. They permit deleting a range of rows or columns, deleting just the selected cells, or deleting just the comments or hyperlinks associated with the selected cells.
Choose or to delete the columns or rows, respectively, that cover the cells in the selection. Selecting when the selection is one or more columns or when the selection is one or more rows deletes all cells in the worksheet. The space left by deleted rows is filled by moving lower rows up. The space left by deleted columns is filled by moving to the left columns which were right of the selection. For example, if columns D and E are deleted, Gnumeric will move the contents of all columns from F onwards two columns to the left.
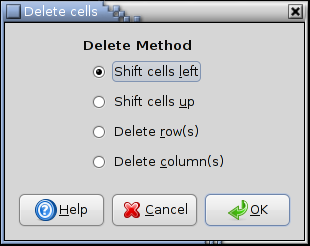
: If the selection is one or more columns or one or more rows, deletes the selected columns or rows as described above. If the selection is a block of cells, opens a dialog asking how to fill in the deleted cells. Blocks of cells can be filled in by the columns of cells below the block selection or by the rows on the right of the block.
For example, if the block of cells from E6:G8 is deleted, those cells would be filled in by the cells below E8, F8 and G8 if the Shift cells up option were chosen. The cells to the right of G6, G7 and G8 would fill in the space from the right if the Shift cells left option were chosen. The two Delete choices are the same as and .
: This is the same as , described above.
: This is similar to , as described above, except that existing cell formats are not disturbed.
-
opens a submenu with three choices:
- opens the dialog. This is the same as the dialog for on the Section 4.2.6 ― Insert Menu. See Section 5.15 ― Comments in Cells for more information.
- opens the dialog. This is the same as the dialog for on the Section 4.2.6 ― Insert Menu. See Section 5.16 ― Hyperlinks for more information.
- opens the dialog. Section 5.17 ― Defining Names explains names and describes the dialog.
-
- 4 Search and replace operations.
-
- — The menu item opens a dialog to search for cells with particular content. The dialog has three tabs. In the first the user can enter the information the user wants to find and some constraints on the search. The second tab gives some extra choices for the search. When the user has picked the options they prefer, pushing the search button on the first tab will run the search. The third tab will show which cells match the search.
- — The menu item will launch a dialog to find cells with particular characteristics and replace them all with a common content. This dialog is similar to the Search dialog.
- 5 Other operations on worksheets.
-
-
— From the submenu you can perform operations on the worksheet as a whole. These functions are also available from the worksheet tab context menu. You can create, duplicate, rename, re-order, or delete worksheets. These functions are described in detail in Section 11.6.2 ― Worksheet Tab Context Menu.
-
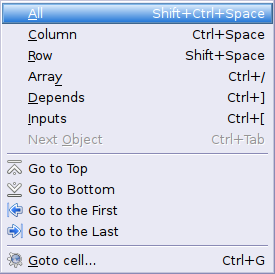
— The menu item allows the user to select various portions of the worksheet. When selected it opens a submenu.
- The item provides a quick way to select the entire worksheet.
- The and items allow the user to select all the rows or columns spanned by the current selection.
- The menu item allows a user to select all the cells which are part of the same array as the current cell.
- The menu item selects all the cells which contain formula that reference data in the current cell.
- Similarly, the menu item selects all the cells whose data is referenced by the formula in the current cell.
- The menu item selects the next sheet object on the current sheet. If no object is selected it will select the object locate at the front.
- The , , , , menu items move the selection within a rectangular block of data cells. the front.
- — The menu item opens up a dialog which allows the user to type the name or address of a cell in the worksheet. The current view will then change to ensure that the selected cell is in the current view and the selection will cover that cell.
-
— The menu item forces the workbook to recalculate its results. This is useful if a formula in the current worksheet depends on a cell in a different workbook. Gnumeric will not necessarily know when that data has been updated so a user can force Gnumeric to recalculate all the cells in the current workbook.
-
- 6 General Configuration of Gnumeric.
-
— The menu item calls the Gnumeric Preferences dialog explained in detail in Chapter 13 ― Configuring Gnumeric
4.2.5. View Menu
The menu is
The menu choices are grouped into the following groups:
- 1 Alternative views of the current document.
-
These menu items allow the user to open multiple views of the same document.
-
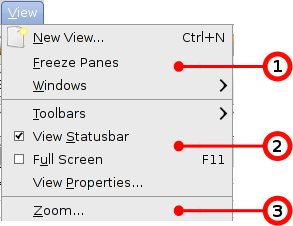
— The menu item opens up a new window with the current workbook visible. and where both windows are open to the same section of the workbook. If the user starts editing a different part of the sheet in one view, the other view moves automatically to that portion of the worksheet. Similarly, if the user changes to a different worksheet in one view, the other view changes also.
-
— The menu item is used to freeze the top-most and leftmost visible portion of the worksheet. This is useful to be able to line up portions of the worksheet which are not usually together. For instance, if a user had a very large table with the titles of each column of data on row 12, the user could select row 13 and select this menu item. If the user scrolled through each data row, the data would line up underneath each header.
There are 3 ways to determine which rows and/or columns should be frozen.
- If the selection is at least partially visible and does not include the cell A1, Gnumeric freezes the portion of the worksheet above or to the left of the current selection.
- If the selection is at least partially visible, includes cell A1, and does not consist of whole rows or columns, Gnumeric freezes all rows or columns intersecting the selection.
- If the selection is at least partially visible, includes cell A1, and consists of whole rows or columns, Gnumeric freezes those rows or columns.
- If the selection is not visible at all, then Gnumeric freezes those rows and columns to the left or above the sixth visible column and tenth visible row.
In all cases, the region of the worksheet above or to the left of the currently visible region will become inaccessible until the view is unfrozen.
-
— The menu item provides access to a submenu which lists all of the windows which are currently open. This provides an easy way to jump between all the different instances and views of Gnumeric documents.
-
- 2 Changes to the current view.
-
These menu items alter the display of the current view.
-
— The menu item provides a submenu which lists each Gnumeric toolbar. The toolbars in this submenu which have a check mark in front of their name will be shown. The display status of each toolbar can be changed by selecting the menu item with that toolbar's name.
-
— The menu item determines whether to display the status bar and information area at the bottom of each worksheets. Selecting the menu item toggles the check mark in front. When this menu item has the checkmark, Gnumeric will display the statusbar.
-
— The menu item changes the display of Gnumeric from a window based display to a display which occupies the whole screen. In full screen mode, the window borders will not be displayed nor will the toolbars. The key F11 toggles between full screen and regular display mode. When this menu item has the checkmark, Gnumeric is in mode.
-
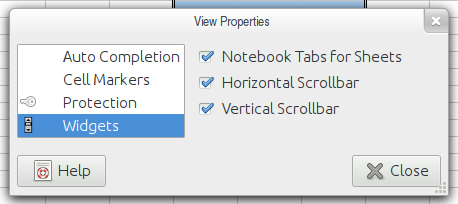
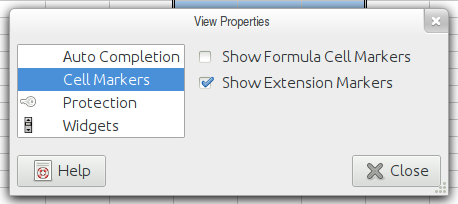
— The menu item opens the dialog.
The dialog has four tabs. is described in Section 11.4 ― General Settings, in Section 11.4.1 ― Content Protection.
The check boxes on the tab shown in Figure 4-11 determine whether cells are shown with indicators that they contain formulae and/or that they have clipped content.
The check boxes on the tab shown in Figure 4-10 determine whether the notebook tabs, the horizontal scrollbar and/or the vertical scrollbars are shown in this view.
-
- 3
-
opens a dialog where you can set the magnification of one or more worksheets in the current workbook.
4.2.6. Insert Menu
The menu is
The menu choices are grouped into the following groups:
- 1 Insert into workbook.
-
These menu items alter the cells available in a workbook.
-
— The menu item opens a dialog asking the user how the sheet should be altered when new cells are inserted. The dialog lists four choices. The user can choose one of these by clicking the mouse pointer on one of the four dots. Only one choice is possible and the currently selected choice has a black dot in front.
The Shift cells right will insert a region of new cells of the size of the current selection. Cells which are on the same row as the selection and within or to the right of the selection will shift over to the right to accommodate the new cells. The Shift cells down choice will also insert a region of new cells the same size as the current selection. With this choice, cells which are in the selection or below the selection will move down to accommodate the new cells. The two other choices will act as if the user had chosen to insert rows or columns. These actions are explained above.
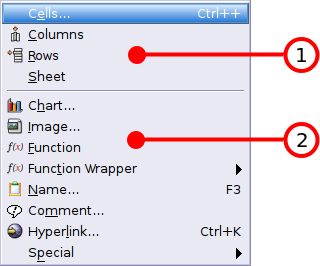
-
— The menu item will insert columns to the left of the current selection. The number of columns inserted will equal the number of columns spanned by the current selection.
-
— The menu item will insert rows above the current selection. The number of rows inserted will be equal to the number of rows spanned by the current selection.
-
— The menu item allows the user to insert a worksheet immediately following the current sheet.
-
- 2 Insert an object into the worksheet or content into the current cell.
-
The menu items insert sheet objects into the worksheet or insert content into the current cell.
-
— The menu item will allow a user to insert a graphic plot of data. This menu item will launch the graph druid. Graphing in Gnumeric is explained in Chapter 10 ― Graphs.
-
— The menu item will allow a user to insert a graphic object containing the image from an external file. The use of images in Gnumeric is explained in Section 9.2 ― Images.
-
— This menu item opens a dialog to allow the user to enter a mathematical formula into the cell. The function dialog includes the names and a brief explanation of all the available functions.
-
— Selecting an item from the submenu shown in Figure 4-13 replaces every rectangular region in the current selection with an array function in which the appropriate function is wrapped around an array version of the current content. This can be used to create a self-sorting data region.
-
opens a dialog with a list of all defined names that can be pasted into the current cell. The dialog is similar to the dialog opened by choosing from the Section 4.2.4 ― Edit Menu. See Section 5.2.4.4 ― Names for details.
-
opens a dialog where you can enter or edit a comment for the active cell. The dialog is described in Section 5.15 ― Comments in Cells.
-
opens a dialog for entering the location of a link. The dialog is described in Section 5.16 ― Hyperlinks.
-
opens a submenu from which you can insert predefined content into a cell. You can insert the current date, the current time, or both.
-
4.2.7. Format Menu
The menu allows users to control the formats of cells, columns, rows, worksheets and the workbook. This menu also gives users access to templates of standard formats.

- offers these menuitems:
-
-
— The menu item opens a submenu with choices to allows the user to modify the formatting of the selected cells.
- — The menu item opens the cell format dialog. This dialog is used to set cell data types and formats. It is explained in Section 5.10 ― Formatting Cells.
- — The menu item opens the conditional format dialog. This dialog is used to set cell data types and formats that depend on values in the workbook. It is explained in Section 5.11 ― Conditional Formatting of Cells.
- — This menu item combines the current selection into a single large cell.
- — This menu item divides a merged selection into the original cells.
- — This menu item makes Gnumeric automatically choose the optimal row heights to display all of the text in the current selection.
- — This menu item makes Gnumeric automatically choose the optimal column widths to display all of the text in the current selection.
-
— The menu item opens a submenu with choices to allows the user to modify the view of the selected columns.
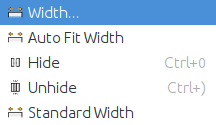
- — The menu item opens a dialog to enable the user to adjust the size of the columns which hold the current selection. The dialog has a single entry box in which the user can change the current size of the column in points.
- — This menu item makes Gnumeric automatically choose the optimal column size to display all of the text in the current selection.
- — The menu item will hide the columns containing the current selection. Gnumeric still holds these columns in memory and will save them to a file but will not display those columns. The only indication that a user has that columns have been hidden is that the column header names are not sequential.
- — This menu item will show columns which are hidden if the selection spans the two columns on either side of the selection. If columns D, E, and F have been hidden, the selection must span at least across columns C and G for this menu item to unhide columns D, E, and F.
- — This menu item allows the user to resize the columns which hold the selection to the standard size. At 100 percent zoom this is 48 points or 64 pixels.
-
— The menu item provides the same functions as the menu item but operates on rows.
- — This menu item opens a dialog which allows the user to type in a row height in pixels.
- — This menu item changes the rows which hold the selection to the optimal height to hold the text in the selection.
- — The menu item will hide the rows in the selection. The workbook still contains the data in the hidden rows but those rows are not shown.
- — This menu item will make hidden rows visible. The selection must span the rows which are hidden for this menu item to unhide the hidden rows.
- — This menu item resizes the rows back to the default height of 12.75 points or 17 pixels (at 100 percent zoom).
-
opens a submenu where you can change properties of the current worksheet. With the exception of and , all operations on this submenu apply to just the current worksheet.
- 1 Sheet Management
-
These items are also on the worksheet tab context menu, accessed by clicking (usually with the right mouse button) on one of the worksheet tabs.
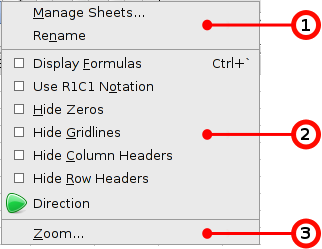
opens a dialog from which the names and many properties of all the sheets can be managed. Properties that can be managed from this dialog include locking, worksheet visibility, column display order (left to right or right to left), sheet name, sheet order, and sheet tab appearance. From this dialog you can also add new worksheets and duplicate or remove existing worksheets. For more information, see Section 11.6.3 ― Manage Sheets dialog.
opens the Rename Sheet dialog. Edit the sheet name in the New Name: field and press Enter or click to change the worksheet name.
- 2 Sheet Display Toggles
-
The second section contains various toggles that control how a worksheet is displayed. If a toggle is enabled, a small check mark is displayed to the left of the menu item.
- — When this property is enabled, the worksheet will show the actual formulae for all cells with formulae, instead of showing the calculated result. You can use this property to quickly determine which cells contain data and which contain formulae.
- — When this property is enabled, Gnumeric uses R1C1-style notation to address cells, rather than A1 notation.
- — When this property is enabled, Gnumeric displays all cells which would display a zero value as empty cells. This can be used to more easily find cells with non-zero data in sheets with many zero results.
- — When this property is enabled, Gnumeric does not draw the grid lines that ordinarily separate cells.
- — When this property is enabled, Gnumeric does not display the column headers, which leaves room in the cell grid for roughly one more row of cells of default height.
- — When this property is enabled, Gnumeric does not display the row headers, which leaves slightly more room to display the contents of cells.
- — When this menu item is selected, Gnumeric switches between left-to-right sheets and right-to-left sheets. If row headers are displayed, they are moved to the right-hand side of the cell grid when the worksheet is displayed right to left.
- 3 Zoom...
-
opens a dialog where you can set the magnification of one or more worksheets in the current workbook.
-
— This menu item opens the autoformat dialog to give user access to a list of format templates. Format templates are useful for users who are often filling out tables in a particular format. The user picks an area of the worksheet into which they want to apply the template. Most templates define headers and footers so the selection area must be big enough to fit those template elements and the user's data. The template will not affect data which has already been input into a worksheet.
The dialog has two tabs: Preview and Template Details. The details are simply information about the template. The Preview tab has three main options: a Settings menu, an Edit menu and a category chooser. The settings menu allows a user to pick what parts of the template they want to copy into the worksheet. The edit menu will be used to create new templates. Currently templates are written as text into an extensible markup language (XML) format. The category chooser gives the user access to different groups of templates. Templates in each category are displayed in the middle area of the dialog. Users select the template they want to use by clicking on it. The currently selected template is highlighted with a red boundary which may be hard to see.
-
4.2.8. Tools Menu
The menu is
The menu choices are grouped into the following groups:
- 1 Automatic tools
-
These two tools allow the user to make Gnumeric automatically correct typing or automatically save workbooks at periodic intervals.
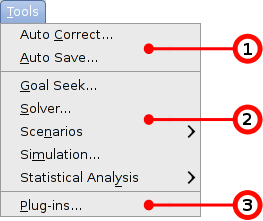
- — The menu item opens a dialog which allows the user to configure the way in which Gnumeric automatically corrects text which is being entered. The dialog presents the user with three tabs. Each of these tabs allows the user to correct one type of common spelling mistake, while allowing the user to add exceptions to the rules. Gnumeric can automatically capitalize the names of week days. Gnumeric can automatically change an entry which starts with two capital letters to only start with one and Gnumeric can change a sentence entry to start with a capital letter.
- — The menu item opens a dialog which allows the user to have Gnumeric automatically save the current workbook after a fixed interval of time. The user can also have Gnumeric ask for confirmation before saving so that the user always remains aware of the state the workbook was in when it was saved.
- 2 Linear programming, scenario generation, simulation and statistical analysis tools
-
Gnumeric can be used to solve systems of linear equations and other mathematical problems. These two dialogs enable access to these tools. A full discussion of these tools is presented in Section 7.1 ― Solver.
- — The menu item opens a dialog through which the user can configure Gnumeric to iteratively search for a numeric value which solves a formula. This dialog is explained in Section 6.3 ― Goal Seek Tool.
- — The menu item opens a dialog through which the user can configure Gnumeric to solve linear systems of equations. This is explained in Section 7.1 ― Solver.
- — The menu item displays a submenu with two entries. The menu item opens a dialog in which the user can select previously defined scenarios. The menu item opens a dialog in which the user can define the contents of a new scenario.
- — The menu item opens a multipaned dialog allowing the user to configure the parameters for a simulation using linear modeling constraints.
- 3 The Plug-ins dialog.
-
This entry launches the plug-in management dialog. Plug-ins are programs which are separate from Gnumeric but provide useful functionality. Some of the core parts of Gnumeric, such as Excel file format support, are actually plugins. This means that a user who never uses Excel files can remove this module from Gnumeric and make Gnumeric use less memory.
4.2.9. Statistics Menu
The menu is

The menu and its submenus contain all available statistical analysis tools. These tools are explained in Chapter 8 ― Statistical Analysis.
4.2.10. Data Menu
The menu is

The menu choices are grouped into the following groups:
- 1 Data Field tools.
-
These menu items allow the user to re-organize data.
-
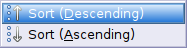
— The menu item opens a dialog which allows users to sort a selection according to defined criteria. By default Gnumeric sorts the rows in a selected area depending on the contents of the cells in a particular column of each row. The sort criteria can be extended to calculate on the basis of the cells in several columns. Gnumeric can sort a selection using any number of rules. Rules can be added using the button. Rules with no column entered will be ignored or the user can remove these rules with the button.
For each rule, the dialog has an entry box in which the column to be sorted must be entered. The dropdown box (the little down pointing arrow) will show a list of appropriate columns. The user can determine a sort order for the selection. The button allows the user to further characterize the sort criteria..
If the first row of the selection is a header, Gnumeric can be told not to shuffle this row during the sort. Gnumeric can also sort columns based on the contents of cells in specified rows, instead of shuffling rows on the basis of columns, if the user toggles the Sort to act right-left instead of top-down.
-
— The menu item opens a dialog that allows users to shuffle a selection. Shuffling means to rearrange the cells in the selection into a random order. The dialog allows users to shuffle the data within a column, within a row, or within an area.
-
— The menu item opens a submenu that allows various forms of data to be created.
-
— The menu item opens a submenu with three entries: , , and entry. Filters are explained in Section 5.12 ― Filtering Data.
-
— The menu item opens the cell format dialog to the validation tab. Validation is a means of constraining the contents of a cell either to have a certain value or to fall within a certain range.
-
— The menu item opens a dialog box through which a user can create derived information based on data in other worksheets.
-
—
-
— The menu item provides a submenu through which users can group rows or columns into units which can be collapsed to be hidden from view. These entries also allow users to alter the display of the grouping handles on the borders of the worksheet.
-
- 2 Data Modifications or Import.
-
These entries allow user to convert data already in a worksheet or to import external data directly into a worksheet.
-
— The menu item opens a dialog box through which a user can create derived information based on data in other worksheets.
-
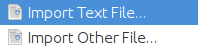
— The menu item provides the following submenu:
The items in this submenu allow the user to import data from various non-spreadsheet formats. To open files in a spreadsheet format, use the menu described in Section 4.2.3 ― File Menu. See Section 14.2 ― File Formats for details. These submenu items create a new window containing the selected file. A more extensive discussion is presented in Section 14.3 ― Opening Files.
-
— The menu item provides the following submenu:
The items in this submenu allows users to export the current file or sheet to a non-spreadsheet format. The menu item repeats the last export in the current session or, if the file was recently imported, exports the file to the original source. To save data from Gnumeric in a spreadsheet format, use the menu described in Section 4.2.3 ― File Menu. For an explanation of the file formats which Gnumeric supports see Section 14.5 ― Saving Files.
-

4.2.11. Help Menu
The menu is quite simple.

The menu connects users to this manual, to the list of functions available for use in Gnumeric and to the list of people who created this wonderful application.
- 1 Entries to find help and report a problem with Gnumeric
-
These menu items allow the user to obtain help from several sources or to report a problem with the program.
-
— This menu entry allows the user to launch the local help system and display this manual.
-
— This menu entry allows the user to launch a web browser and explore the web site dedicated to Gnumeric on the server used by the GNOME project.
-
— This menu entry allows the user to launch an Internet Relay Chat (IRC) client to join the GIMPnet network and the #Gnumeric channel. This channel is used by the Gnumeric developers. There is generally someone around who will, after a few minutes, notice a nice question and attempt to answer it.
Live assistance is provided on a purely voluntary basis. There are no guarantees that your question will be answered or that the answer will be correct. We generally try our best to answer questions when they are asked politely and when the user shows that they have at least looked in the User Manual for an answer.
-
— This menu entry allows the user to launch a web browser and open the page on GNOME's GitLab issue/ bug entry system for the Gnumeric program. This page includes instructions on submitting reports of problems. The first time a user reports a problem, they will be asked to login to the system.
-
- 2 The About Gnumeric dialog.
-
—Shows basic information about Gnumeric, such as the authors' names and the application version number.