Overview
This part of the Gnumeric manual explains the pieces of the software that users can manipulate. The menus, the toolbars and the cell grid area comprise what is called the graphical user interface of an application because it is an interface --- a way to interact with Gnumeric --- which is made of graphical elements --- pictures --- designed to be used by human users.
Gnumeric opens by default with a view of an empty workbook which is called "Book 1" and which contains three worksheets: "Sheet1", "Sheet2", and "Sheet3" as can be seen in Figure 4-1. The outermost portion of the window is not actually part of Gnumeric and may look different on different machines. Gnumeric attempts to place its name and the name of the workbook on this outer portion.
The majority of spreadsheet work is done while interacting with this view of Gnumeric. All of the functions which Gnumeric provides can be accessed quickly from here. The graphic elements of Gnumeric are made of several independent pieces. Figure 4-1 shows a newly opened, empty Gnumeric with the principle elements labelled.
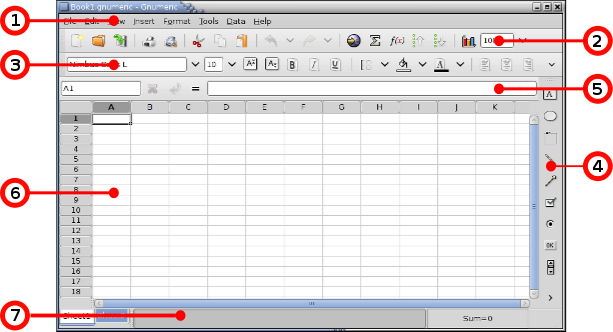
The elements names are listed below along with a reference to the section that discusses that element. Those reading this document on their computers may be able to click on the references to jump to that section of the manual.
- 1 The menubar
-
The menubar provides access to the core functions of GNOME. Almost everything that can be done in Gnumeric can be done through the menus. The menus and menubar are discussed in Section 4.2 ― Menus.
- 2 The standard toolbar
-
The standard toolbar provides shortcuts for the most used items in the menus. The toolbars are discussed in Section 4.4 ― Toolbars and this toolbar in particular in Section 4.4.2 ― The Standard Toolbar.
- 3 The format toolbar
-
The format toolbar changes the display properties of data in the workbook. It is presented in Section 4.4.3 ― The Format Toolbar, part of the general discussion of toolbars of Section 4.4 ― Toolbars.
- 4 The object toolbar
-
This toolbar enables the user to draw graphic elements on the sheet, such as text labels, big red circles or thin green arrows. These can be used to bring attention to a particular part of a worksheet. The object toolbar is explained in Section 4.4.5 ― The Object Toolbar in the Section 4.4 ― Toolbars portion of the manual.
- 5 The data entry area
-
The data entry area is useful for the modification of complex formulas. It is discussed in Section 4.5 ― Data Entry Area.
- 6 The cell grid area
-
The cell area lies in the middle of all the rest. The cell area includes the row and column labels, the scrollbars and the tabs below. The use of these elements is explained in Section 4.6 ― The Cell Grid.
- 7 The information area
-
This area is used by Gnumeric to give feedback on the status of certain operations. This information is explained in Section 4.7 ― The Information Area.
The next chapters will explain each of these elements. Section 4.2 ― Menus will explain the menus, Section 4.4 ― Toolbars will explain the toolbars, Section 4.5 ― Data Entry Area will explain the data entry area, Section 4.6 ― The Cell Grid will explain the cell grid area, and Section 4.7 ― The Information Area will explain the information area.