Hyperlinks
Each cell can have an associated hyperlink. A hyperlink permits the user of a spreadsheet to go directly to a particular cell or group of cells, to access another file on the local computer or on the web, or to send an email message to an address built into the link.
To add a hyperlink to one or more cells, first select the cells. Next choose from the Section 4.2.6 ― Insert Menu to open the dialog.
If the selection includes a hyperlink, the dialog is initialized from the existing link. If there is more than one hyperlink in the selection, the cell in the first row that has a hyperlink, and the first such column of that row, is used to initialize the dialog.
When you click on , the information in the dialog is attached to each cell in the selection, replacing any previously defined links. For any empty cells in the selection, the text of the link is set as the contents of the cell. For all cells in the selection, the cell format is modified to give the contents a distinctive color, and the text is underlined.
If the link location text box is empty when you click on , no hyperlink is created. Instead, if any cells in the selection have existing hyperlinks, those hyperlinks are removed. The distinctive format applied to links is not removed. For that reason it might be preferable to choose Clear ▶ Formats & Hyperlinks from the Section 4.2.4 ― Edit Menu to remove existing hyperlinks.
Gnumeric supports four types of hyperlink. The first element of the dialog, the menu, selects the type of hyperlink to be created. The dialog varies slightly, depending on the selected hyperlink type:
-
Internal Link: The second element of the dialog is a text box labeled "Target Range". You can enter a single range, with or without a worksheet name. To select the range from the worksheet, click on the button at the end of the "Target Range" line. This collapses the dialog to a single line and makes it possible to interact with the cell grid. Select the desired sheet tab, if necessary, then select the desired cells. When the selection is complete, click on the button at the end of the Target Range input box to open the full dialog again.
When an internal link is activated by clicking on the cell, the range of cells given by the link address becomes the current selection. The cell closest to A1 in the new selection becomes the active cell.
-
External Link: The second element of the dialog is a text box labeled "File". Enter the path to a file. You can also enter a Universal Resource Locator (URL) here; the URL is accessed as described for Web Link below.
When an external link is activated by clicking on the cell, Gnumeric launches an application to present the file, based on its apparent type. For example, "mypic.jpg" would be opened in an image viewer, while "myinfo.html" would be opened in a web browser.
-
Email Link: The dialog provides text boxes where you can enter the destination address and subject line for an e-mail message.
When an email link is activated by clicking on the cell, Gnumeric launches an e-mail client to send a message. The message is initialized with the destination address and subject specified in the dialog.
-
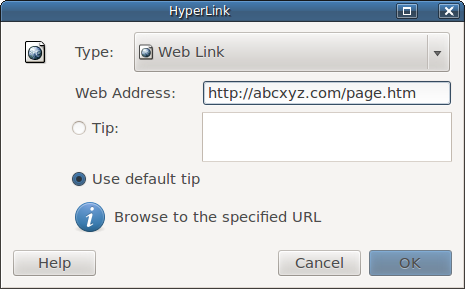
Web Link: Enter a Universal Resource Locator (URL) in the Web Address text box.
When the link is activated by clicking on the cell, Gnumeric launches an application to display the information at the specified URL, based on its apparent type. For a web address beginning with "http://" or "https://" the application is the default web browser.
When you move the mouse pointer to a hyperlink in the cell grid, a tool tip appears. The default tip shows the link address and instructions for activating the link or selecting the cell. To define a tip specific to the link, select the radio button next to "Tip", then enter the tip text in the text box. If the link-specific tip is selected and left blank, no tip is displayed when the mouse pointer is on the link.