Managing Worksheets
This section discusses functions that manipulate worksheets as a whole, rather than their contents.
- 11.6.1. Worksheets and the Menubar
- 11.6.2. Worksheet Tab Context Menu
- 11.6.3. Manage Sheets dialog
- 11.6.4. Adding a Blank Worksheet
- 11.6.5. Copying or Pasting a Worksheet
11.6.1. Worksheets and the Menubar
Gnumeric provides a number of options for manipulating worksheets as a whole, rather than the contents of the worksheets. These operations are documented in the later section Section 11.6.2 ― Worksheet Tab Context Menu. In addition to the worksheet tab context menu and the submenu of the menu, some of these operations are also available from other menus:
- The Insert function is also available as on the menu.
- The Rename and Manage Sheets dialogs are also available on the submenu.
In addition to worksheet manipulation, Gnumeric provides the ability to control various aspects of how or whether a worksheet is displayed in the cell grid. Several such controls are included in the Section 11.6.3 ― Manage Sheets dialog, described in a later section. Other worksheet display controls are located in the Format ▶ Sheet submenu, which are described there.
11.6.2. Worksheet Tab Context Menu
Except for the addition of the two submenus, which appear only on the context menu, this is the same as the submenu. The dialog is discussed in Section 11.6.3 ― Manage Sheets dialog, which follows the description of the context menu.

- — Select this menu item to insert a new, empty worksheet ahead of the current worksheet. The new worksheet is the same size as the current one.
- — Select this menu item to add a new, empty worksheet at the end of the existing worksheets. The new worksheet has the default size, which can be set in the Gnumeric Preferences dialog in the “Windows” tab.
- — Select this menu item to add a copy of the selected worksheet immediately after the selected worksheet.
- — Select this menu item to delete the selected worksheet.
- — Select this menu item to access the Rename Sheet dialog, which lets you change the name of a single worksheet. To rename more than one worksheet, the Manage Sheets dialog may be more convenient.
- — Select this menu item to access the Resize Sheet dialog. Use the sliders to adjust the size of the sheet, then click OK. Worksheet dimensions are restricted to powers of two. By default the Resize Sheet dialog changes the sizes of all worksheets in the current workbook. To change the size of a single worksheet, clear the check mark next to Apply change to all sheets before clicking OK.
- and — Select one of these menu items to access a menu of worksheet names. Click on one of the names to select that worksheet. The displayed tabs are adjusted so that the selected worksheet's tab is visible, and the selected worksheet is displayed in the cell grid.
11.6.3. Manage Sheets dialog
The Manage Sheets dialog can be accessed from the worksheet tab context menu, from the submenu, or from the submenu.
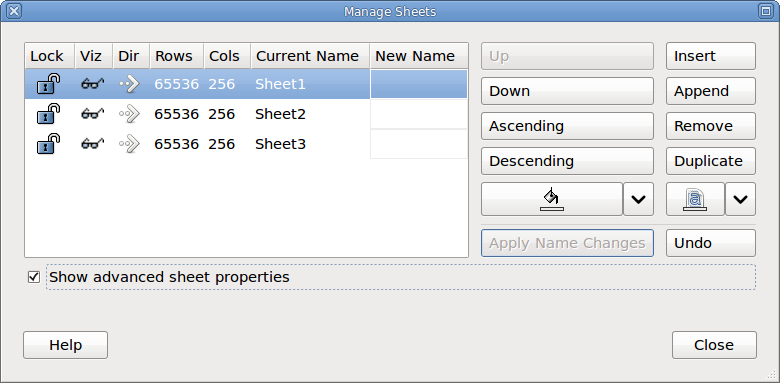
The worksheets contained in the current workbook are listed in the upper left portion of the dialog. When Show advanced sheet properties is enabled, the Dir, Rows, and Cols fields are included. A worksheet can be selected by clicking anywhere in its line, although clicking one of the icons will toggle its associated property along with selecting the worksheet. Multiple selection, using the Shift and Ctrl keys, can be used to operate on more than one worksheet at a time. The current worksheet shown in the cell grid tracks the selected worksheet in this dialog. That is, selecting a single worksheet from the list also causes that worksheet to be displayed in the cell grid. When more than one worksheet is selected in the list, the first one in the list is set as the current worksheet in the cell grid. Some operations are not available when more than one worksheet is selected. The buttons for those operations are dimmed when they are unavailable.
The Lock column of the list shows an icon to indicate whether
the worksheet is locked,
![]() , or unlocked,
, or unlocked,
![]() . Click on the displayed icon to toggle the sheet's lock status.
Locking a worksheet prevents accidental modification of the data on
that worksheet.
. Click on the displayed icon to toggle the sheet's lock status.
Locking a worksheet prevents accidental modification of the data on
that worksheet.
The Viz column of the list shows an icon,
![]() , if the worksheet is currently visible. The Viz column
is blank if the worksheet is not visible.
Click in this column to toggle the worksheet's visibility.
When the visibility attribute is turned off, the worksheet does not get a
tab at the bottom of the Gnumeric window.
Its data is preserved, and references to cells on the non-visible
sheet continue to access the expected values.
Note that a non-visible worksheet cannot be selected from the list, although
the active fields in the list continue to function.
To apply functions that require selecting the worksheet, such as
Insert or Remove, first click in
the Viz column to make it visible.
, if the worksheet is currently visible. The Viz column
is blank if the worksheet is not visible.
Click in this column to toggle the worksheet's visibility.
When the visibility attribute is turned off, the worksheet does not get a
tab at the bottom of the Gnumeric window.
Its data is preserved, and references to cells on the non-visible
sheet continue to access the expected values.
Note that a non-visible worksheet cannot be selected from the list, although
the active fields in the list continue to function.
To apply functions that require selecting the worksheet, such as
Insert or Remove, first click in
the Viz column to make it visible.
The Dir column of the list shows a right-pointing or left-pointing arrow, depending on whether the sheet is currently set to be displayed left-to-right or right-to-left. Click on the arrow to toggle a worksheet's display direction.
The Rows and Cols columns show the current size of each worksheet. Worksheet size cannot be adjusted here.
To change the name of a worksheet, click in its New Name field until the contents of the field, if any, are highlighted, then type the desired new name and press Enter. If the new name duplicates a name already in use, a warning is displayed. You can change the new name or you can assign a new name to the other worksheet with that name. Name changes are not applied immediately. Instead, Gnumeric waits until you click on the Apply Name Changes button and makes all the name changes at once. When you apply the name changes, Gnumeric automatically updates all cell references that include worksheet names to use the new names.
The worksheets can be re-ordered in the workbook by pressing the left mouse button in a worksheet's line and dragging it up or down in the list of worksheets. You can also select a single worksheet and then click on the Up or Down button to move it up or down in the list. Alternatively, you can sort the worksheets into ascending or descending order by name by clicking on the Ascending or Descending button.
You can add an empty worksheet by clicking on Insert, to add the worksheet ahead of the selected worksheet, or on Append, to add the worksheet after the last sheet in the list. Insert creates a new worksheet the same size as the currently selected worksheet, while Append creates a new worksheet of the default size.
Click on Remove to delete the currently selected worksheet or worksheets.
Click on Duplicate to add an exact copy of the selected worksheet to the list immediately following the selected sheet. The name of the new worksheet is the same as the name of the duplicated worksheet, but with “(n)” appended, where n is the smallest integer greater than 1 that produces a unique worksheet name. If the worksheet name already ends in “(n)”, nothing is appended. Instead, the value of n is increased to the smallest value that produces a unique worksheet name.
To change the background color of the tabs for the selected worksheets,
click on the background color fill button,
 to set the background color to the color shown below the bucket icon, or
click on the downward-pointing arrow to access the color selection dialog.
to set the background color to the color shown below the bucket icon, or
click on the downward-pointing arrow to access the color selection dialog.
Similarly, to change the color of the text in the tabs of the selected worksheets,
click on the text color button,
 to set the text color to the color shown below the character icon, or
click on the downward-pointing arrow to access the color selection dialog.
to set the text color to the color shown below the character icon, or
click on the downward-pointing arrow to access the color selection dialog.
11.6.4. Adding a Blank Worksheet
A new, empty worksheet can be added to a workbook by insertion ahead of the worksheet currently displayed in the cell grid or by appending one after the last worksheet.
A new worksheet can be inserted ahead of the current worksheet by selecting from the menu or from the worksheet tab context menu or by using the Insert function of the Manage Sheets dialog described above. The new worksheet will be the same size as the one currently displayed.
A new worksheet can be added to the end of the list by selecting from the worksheet tab context menu or by using the Append function of the Manage Sheets dialog described above. The new worksheet will be the default size.
11.6.5. Copying or Pasting a Worksheet
Gnumeric does not directly support copying and pasting of worksheets, however copying blocks of cells provides a very similar function. For example, to replace the contents of worksheet Sheet3 with the contents of Sheet1, begin by selecting the worksheet tab for Sheet1. Select all the cells in Sheet1 by clicking on the blank rectangle at the top of the row headers, to the left of the column headers, or by selecting from the Edit menu. Next use or to copy the worksheet contents to the clipboard, depending on whether you want to copy or move the information. Select the worksheet tab for Sheet3 and select cell A1 or the entire worksheet, then use or from the Edit menu to copy the contents of Sheet1 into Sheet3.
Use of Paste Link in the Paste Special dialog should be avoided when operating on whole worksheets, as it creates links to every selected cell in the first worksheet, 16,777,216 cells in a worksheet of the default size, and has no option to skip empty cells in the first worksheet.
A similar operation can be performed using the Manage Sheets dialog. Duplicate the worksheet to be copied, then move the copy to precede or follow the worksheet it is to replace. Delete the second worksheet and rename the copy. This operation is similar to the copy and paste technique described above, but this method also copies metadata, such as the display appearance controlled by the submenu.