Importing Text Files
Gnumeric can import data which is organized as text fields structured in some systematic fashion either from a file or from the clipboard. Importing structured text may require extensive intervention on the part of the user so Gnumeric provides a Text Import druid, which is a three paneled dialog with configuration options. For text imported from files, this druid appears after the file has been imported, using the menu item in the submenu of the menu as described in Section 4.2.10 ― Data Menu. For text imported from the clipboard, the druid appears when a user attempts to paste the text into a worksheet, as is explained in Section 5.7.4 ― Cut and Paste Between Gnumeric and Other Applications.
The text import druid contains three panels but the middle panel differs depending on the structuring system used, either with data fields separated by a special character or with data fields occurring at equally spaced intervals in each line. The first panel allows the user to configure the character encoding, line break characters, structuring system, and line range. The second panel allows the user to define the columns by either, for separated data, setting the separating character and text delimiting character, or, for fixed space data, by setting the column spacing. The third panel allows the user to select which columns to import and define their data types.
- Launch the Text Import druid using, in the , the and selecting the "Text import (configurable)" file format type.
- Define the character encoding of the text block.
- Define the characters indicating the breaks between the lines.
- Select the line range from the text block to be imported.
- Go to the second panel, which will be different for data structured by separating characters and data structured by fixed spacing.
- (For separated data) Define the separating character.
- (For separated data) Define the character grouping a text field.
- (For fixed width data) Define the field widths.
- Go to the third panel.
- Configure the inclusion of empty outside columns.
- Select the locale that will influence the formatting of the numerical elements in each column.
- Select the numerical formats for the data in each columns.
- Select the columns to be included in the imported block.
- Click on the button.
This explanation of the Text Import druid will first start with a discussion of text files including character encodings and line break delimiters. The explanation will then cover the various strategies used to structure numeric data in text files. Following these discussions, the components of the druid will be presented and, finally, a detailed explanation of each step in the use of the druid will be presented.
14.4.1. The complexities of text format files
The use of text format files to store and transmit data for use in a spreadsheet involves three somewhat complex decisions which determine how the file expresses and separates each data value. These complexities must be understood for a user to be able to use the Text Import druid effectively. These complexities exist because of the limitations of early computers and because or the historical development of computer systems by different manufacturers and programmers, in different countries, targeting different types of users, speaking different languages.
The first complexity involves the different systems which relate the contents of a computer file to the characters in a written language. All text files on a computer consist of a long sequence of binary digits. Text files are files in which these digits are used to indicate different textual characters. Character 'encodings' are standardized systems which relate the binary digits in a computer file to a formal system of characters which includes both text glyphs (shapes) and formatting indicators. Each encoding defines a way to interpret the binary digits and uses the characters from a particular character set. The alternative character encoding strategies are explained in greater detail in Section 14.4.1.1 ― Character Encodings, below.
The second complexity involves the decision of how to separate the characters in a file into different lines. Text files explicitly determine the end of each line of a file with a specific character or sequence of characters. The complexity involves the particular character sequence used to determine the end of each line. Different conventions have been used in different computer systems. The alternative line breaking strategies are explained in greater detail in Section 14.4.1.2 ― Line break delimiters, below.
The third complexity involves the decision of how to separate the characters in each line into separate value fields. Again, different strategies exist. These can be separated into two broad categories: strategies which use a character or sequence of characters to separate the values, so called 'delimited' or 'separated' strategies, and strategies which use the position of the character in the line to separate the values, so called 'fixed-width' strategies. The alternative data structuring strategies are explained in greater detail in Section 14.4.1.3 ― Data Structuring Strategies, below.
Fortunately, the Gnumeric Text Import druid provides users with a way to preview the information in a text file. This enables users to change the settings which determine each of these three conventions until the text in the preview correctly shows the contents of the data file. Therefore, while the details of these three steps are complex, the practical impact on users is minimal. Users can simply experiment until the file appears correct without having to understand each of these complexities in detail.
- 14.4.1.1. Character Encodings
- 14.4.1.2. Line break delimiters
- 14.4.1.3. Data Structuring Strategies
14.4.1.1. Character Encodings
The use of text files to store data in a structured fashion for use by spreadsheet programs, and more generally all text files, require some scheme to relate the binary number in the computer file itself to the characters of a written language. Such schemes are called 'encodings'.
The origin of computers led to the invention of a number of different encoding schemes. Due to the limitation of early computer hardware, these encoding schemes all restricted themselves to character sets which contained only the most essential characters of the English language. The desire to support characters which were not in this basic set of characters led to the creation of new encoding schemes, many of which restricted themselves to the characters in specific languages. One encoding scheme, called UTF-8, has now emerged as the best encoding scheme for the future for a multitude of reasons including its ability to co-exist with current operating systems and its ability to encode all of the characters in the largest set of characters which has been consistently defined, the Universal Character Set. However, the existence of the diversity of encoding schemes means that for the foreseeable future, files will be created and distributed using several different schemes. This is especially true for files containing text in languages other than English.
This complex situation generally does not impact users. Gnumeric has been designed to deal with most of the complexity. Many kinds of files, such as the Gnumeric file format itself, describe their encoding scheme internally in such a way that it can be easily recognized. Gnumeric also provides an easy approach to changing the encoding scheme in case this proves necessary.
Encoding schemes merely prove a hindrance to users when opening files. There is no danger that data be lost or that any other serious problem arise by selecting the wrong scheme. If the wrong scheme is selected, either the file will contain characters which are nonsensical and Gnumeric will open an error dialog asking the user to select a different encoding scheme, or the preview area will display nonsensical characters. These nonsensical characters may simply be characters grouped together which do not occur in any language, such as "åÕÛÛÞ", or may be characters for which a graphical representation (a glyph) does not exist in the font being used and is therefore displayed using a small box with four numbers inside. Each of these errors indicates that the encoding scheme used to read the file was not the same encoding scheme as was used to create the file. The difficulty is then to determine what encoding scheme to use. A simple process of trial and error should lead to picking the right scheme.
A basic strategy to find the right encoding for a file being imported into Gnumeric is, first, to use the scheme proposed by Gnumeric and, then, to hunt for the correct encoding. The default encoding scheme is the one defined by the locale setting of the user and this is also the default scheme Gnumeric uses to create text files. If the default encoding is incorrect, the correct encoding must be found by trial and error. One strategy to use is to examine the major western encodings and then the major regional encodings. The major western encoding schemes are ASCII, ISO-8859-1, and UTF-8, but ASCII is a subset of the other two so it does not need to be tried on its own. The major regional encodings are the IS0-8859-x schemes since these have become quite popular in GNU operating systems. Alternatively, the various character sets used by the Microsoft operating systems can be attempted. The encoding schemes are listed under "Western", "Unicode", and the alphabet names.
The World Wide Web has many resources dedicated to explaining encoding systems and other related information. One of the best sites discussing UTF-8 and Unicode is the UTF-8 and Unicode FAQ for UNIX/Linux page maintained by Markus Kuhn. The Unicode project has a web site which includes an online copy of their standard character set. A discussion of the ISO-8859 family of encodings can be found at a page titled: "The ISO-8859 Alphabet Soup", which may alternatively be found here. A similar discussion on Wikipedia, focusing on the western alphabets, can be found here.
14.4.1.2. Line break delimiters
The use of text files to store data in a structured fashion for use by spreadsheet programs requires a scheme to separate each line of the file. Structured text files rely on the files having explicitly defined rows within the file as one component in the structuring system. Each of these rows is defined by a character sequence indicating the end of a row.
Two characters that are part of the ASCII code, an early encoding that became a widely followed standard, were included to help define the end of the line. These are the 'linefeed' character and the 'carriage return' character, named after the two processes which occur when a typewriter starts a new line: first the typewriter barrel rolls - the linefeed - then the whole carriage with the sheet of paper moves back to the starting point -the carriage return. In the same way that different computing systems have used different encoding schemes, three different approaches became common for defining the end of the line.
In GNU operating systems and other systems that inherit from the UNIX legacy, the end of a line was defined simply using the 'linefeed' character. The pre-OSX Macintosh operating system chose instead to use only the 'carriage return' character. The Windows operating system uses both characters in the sequence 'carriage return' then 'linefeed'.
A user opening a file into Gnumeric will see, in the preview area of the Text Import druid, whether or not the line breaks have been recognized correctly and will be able to alter the recognition settings. An incompatible setup will either yield a single unbroken line of text, lines of text with extra, empty rows between them, or lines of text with extra symbols at the start or end of each line.
The correct line break delimiters can be established by checking or unchecking the alternatives. The preview area will then show the result of the file interpreted with these settings.
14.4.1.3. Data Structuring Strategies
The use of text files to store data in a structured fashion for use by spreadsheet programs also requires some scheme to separate each value within every line. Two different approaches are used to separate these values. The first strategy, uses a particular character or character sequence to denote the start and end of each value. Such strategies are called 'Separated Value' or 'Delimited Value' systems. The second strategy places each value stating at a specified position in the line. Such strategies are called 'Fixed Width' strategies because they inherently require that each value have a pre-determined size.
Separated Value structuring systems distinguish the contents of each value using pre-determined characters to separate the values. Certain characters have become common in such schemes, for-example 'Comma Separated Value' files use a comma character to separate values while 'Tab Separated Value' files use a tab character. Gnumeric allows the user to define the value separator to be any one of several common characters or a specific sequence of characters, either on their own or in combination. For example, a file could use both space characters and tab characters to separate values. Similarly, a file could be read which used the entire word 'STOP' to separate values like the common scheme to separate sentences in a telegram.
Separate Value structuring systems often also include a method to surround a single text value which may itself contain the character used to separate values. The quote character is often used in this role but Gnumeric allows users to configure any character in this role. For example, a file which used the comma to separate values could nonetheless contain a value like "Zoe, Sally, Dodji" if this value had appropriate text indicating characters at either end.
Fixed Width structuring systems are common formats for the output of database tables since the contents of these tables have often been defined as variables of a particular size. To import these files, users must specify exactly the start of each column so that the importer can separate the values on each row.
14.4.2. The Components of the Text Import Druid
The Text Import druid consists of three panels with the middle panel differing according to the type of data structuring used.
The first panel allows users to configure the character encoding used by the file, to determine the character sequences used to separate lines, configure the type of structuring being used and select the lines of the file to import. The second column allows the user to define the separation strategy used for each value. For separated value files this involves defining the separating character sequences and the text indicating character. For fixed width files, this involves defining the width of each column. The third panel allows the user to select the columns to be included during the import and to select the format of the values in each column.
Users navigate the Text Import druid by clicking on the button on each panel after they have configured the settings properly. The third panel contains a which causes the file to be imported to a workbook using all the settings as they are configured.
14.4.2.1. The first panel of the Text Import Druid.
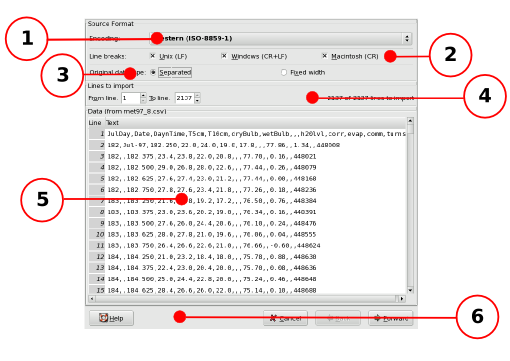
The first panel of the Text Import Druid allows users to set the file encoding, to determine the character sequences used to separate lines, configure the type of structuring being used and select the lines of the file to import.
The different components of the first panel of the Text Import druid with each component labeled with a callout.
The purpose of each labeled component in Figure 14-2 is explained below:
- 1 - The file encoding selection menu.
-
This drop down menu provides a list of encoding schemes for the characters in the text file. By default, Gnumeric selects the encoding scheme used by the locale of the user. See Section 14.4.1.1 ― Character Encodings for more details.
- 2 - The line break character selector.
-
These three check boxes can be selected individually or together to define the sequences which will be interpreted as line break indicators. Generally, selecting all three boxes will produce the correct results.
The errors produced if the wrong combination of boxes is selected will include the entire file being placed on a single line, empty lines appearing between the lines of the file, or undefined symbols appearing at the beginning or end of almost every line. See Section 14.4.1.2 ― Line break delimiters for more details.
- 3 - The data structuring system selector.
-
These two push buttons allow the choice between the two different structuring schemes, data structured by placing a separating character between the data values and data organized in fixed width columns. Note that this choice will determine which panel will be shown as the second panel of the druid. See Section 14.4.1.3 ― Data Structuring Strategies for more details.
- 4 - The line range spinbuttons.
-
These two spin buttons allow the user to select the start and end rows for the data import. The spin boxes can be used either by typing a new value in the text entry area where the numbers are displayed, or by using the mouse button to click on the up arrow to increase the number and the down arrow to decrease the number.
For instance, if the text file contained a large header area with meta information, this header could be excluded from the data imported to the Gnumeric worksheet by increasing the number of the starting, "From", line.
- 5 - The preview area.
-
This area displays a preview of the file as it will be interpreted when the settings that are currently selected in this first panel are applied.
- 6 - The button area.
-
These four buttons allow the user to navigate the druid. The button should open the Gnumeric manual to this section. The button will dismiss the dialog and return the user to the worksheet. The button is disabled since this is the first panel of the druid and the button will bring up the next panel in the druid.
14.4.2.2. The second panel of the Text Import Druid used for separated data
The second panel of the Text Import Druid used for separated data allows the user to configure the character sequences used to separate the values in each row and to configure the text delimiting characters. Gnumeric, by default, guesses which characters are being used to separate values and pre-sets those characters. The user can, however, reconfigure these characters.

The different components of the second panel of the Text Import druid for separated data with each component labeled with a callout.
The purpose of each labeled component in Figure 14-3 is explained below:
- 1 - The separator definition area.
-
This are allows the user to define the characters used to separate data value fields within each row. The checkboxes can be pressed to add or remove characters from those treated as separators. Additionally, the 'custom' type allows the user to define either other single characters, or a particular character sequence used to separate values. The preview area in the panel will show the file processed with the rules which have already been applied.
Generally, this type of file structuring uses a single character to separate fields but it is possible to use either several different characters or to use a sequence of characters. For example, it would be possible to use the old telegraphic convention of separating phrases with the word 'STOP' by selecting the 'custom' separator type and entering the character sequence 'STOP' in the text field.
This area also includes a checkbox enabling two separator sequences that immediately follow one another, to be treated as a single separator. This option will only be useful where data is imported with one or more completely empty columns and no partially filled columns. If this option is checked and the data file has partially filled columns of data, the columns will be jumbled during the text import operation.
See Section 14.4.1.3 ― Data Structuring Strategies for more details.
- 2 - The text indicating character area.
-
Separated value files often additionally define a character used to indicate the start and end of a data element which should be considered a single text entry. This strategy allows the inclusion of text entries which include the value separator.
For example, a file which is structured as a comma separated value file, could use the double quotation mark to delimit text values and would then be able to include text values such as: 'Zoe, Mark, Sally'.
- 3 - The preview area.
-
This area displays a preview of the file as it will be interpreted when the settings that are currently selected in the first and second panels are applied.
- 4 - The button area.
-
These four buttons allow the user to navigate the druid. The button should open the Gnumeric manual to this section. The button will dismiss the dialog and return the user to the worksheet. The button will take the user back to the first panel, without, however, changing the settings in this second panel. The button will bring up the next panel in the druid.
14.4.2.3. The second panel of the Text Import Druid used for fixed width data
The second panel of the Text Import Druid used for fixed width data allows the user to define the widths of each column to be imported. Gnumeric provides a mechanism to automatically guess the widths of the columns and allows the user, using the mouse, to define the widths of the columns.
The different components of the second panel of the Text Import druid for fixed width data with each component labeled with a callout.
The purpose of each labeled component in Figure 14-4 is explained below:
- 1 - The automatic column discovery button.
-
This left most button, named , will cause Gnumeric to scan the file an attempt to assign the columns automatically. The example presented in Figure 14-4 shows one result after this button has been pressed: many of the columns were discovered automatically, but the second and third columns were misidentified. Nonetheless, the automatic mechanism provides a useful starting point. The definition of the columns can be refined using the methods described below.
- 2 - The column definition clearing button.
-
This right most button, named , will clear all the column definitions and reset the file to a single column. This button should be used cautiously since there is no way to reverse its action and any carefully prepared column definition layout will be irretrievably lost.
- 3 - The preview and column width definition area.
-
This area acts as both a preview area and an area where users can define the columns widths.
As a preview area, this area displays a preview of the file as it will be interpreted when the settings that are currently selected in this first panel are applied.
This area can also be used to define column widths. When the panel first appears, a single column will be defined. The automatic column discovery mechanism may split this single column into many more columns. The mouse can then be used to further divide columns or to join previously separate columns.
A new column can be defined by placing the mouse pointer where the column should start and double-clicking with the primary mouse button. This will split the column which used to contain this position and add a new column starting at this location.
To remove the definition of a column which already exists or to alter the ending position of a column, the context menu must be used. The context menu appears by clicking with one of the secondary mouse buttons. A column which has already been defined can be merged with the column on the left or right using the or menu items. The size of a column can be increased by placing the mouse pointer inside the column area or header and using the or menu items, respectively. Either of these will change the width of the column by changing the right hand end of the column.
The context menu can also be used to define new columns using the menu item but the double-click approach described above should be easier.
- 4 - The button area.
-
These four buttons allow the user to navigate the druid. The button should open the Gnumeric manual to this section. The button will dismiss the dialog and return the user to the worksheet. The button will take the user back to the first panel, without, however, changing the settings in this second panel. The button will bring up the next panel in the druid.
14.4.2.4. The third panel of the Text Import Druid
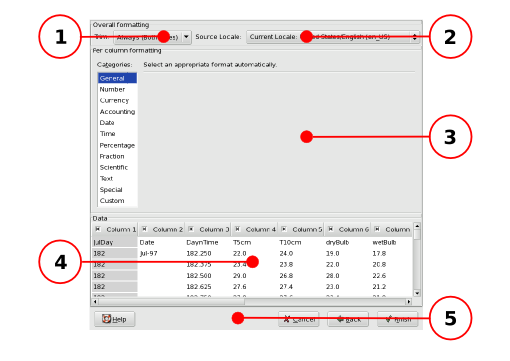
This panel allows users to select and format the columns to be imported to the Gnumeric workbook. The first button allows the exclusion of empty columns on either of the outer sides of the columns with data. The second button allows the user to define the locale used to interpret the values in the file. The remaining area allows the user to predefine the data format to be used for all the values in each column. This area also allows the users to select which columns in the file will be imported to the Gnumeric worksheet. Finally, this panel provides the which is used to dismiss the dialog and import the file.
The different components of the third panel of the Text Import druid with each component labeled with a callout.
The purpose of each labeled component in Figure 14-5 is explained below:
- 1 - The trim of empty outer columns drop down list button.
-
This button provides a list allowing the user to select whether to trim any outer columns which are completely empty. The choices are to delete the columns on both sides, on neither side, or on one side only. This will only affect columns which have been previously defined but which contain no data values at all.
- 2 - Locale definition for import drop down menu button.
-
This button provides a list of locales which can be set. The chosen locale will affect how numeric values are interpreted when then are imported. For instance, the locale will define the character expected as the decimal separator which is the period character (.) in some locales, and the comma character (,) in others. These locales generally then use the other character as the spacer grouping the digits in thousands.
- 3 - The column data format selection list.
-
This list allows predetermining the format which Gnumeric will assign to each of the values in the columns selected below. Cell data formats are explained in Section 5.10 ― Formatting Cells.
To use this list, first, one or more columns must be selected in the preview area below, then, a data format in this list can be selected, and finally any details of the format can be configured. Number formats for instance allow the user to force numbers to contain fixed number of digits after the decimal point.
- 4 - The column selection, inclusion, and file preview area.
-
This area allows users to select columns which will be preformatted, to select which columns to include in the import and to preview the file. Each single column can be selected by clicking with the mouse pointer on the column header. Any single column can be excluded from the data imported to the Gnumeric worksheet by clicking in the checkbox in the column header to remove the check mark. The area also provides a preview of the data in the text file showing the effect of the with the current configuration.
- 5 - The button area.
-
These four buttons allow the user to navigate the druid. The button should open the Gnumeric manual to this section. The button will dismiss the dialog and return the user to the worksheet. The button will take the user back to the second panel, without, however, changing the settings in this third panel. The button will dismiss the druid and cause the file to be imported into a new worksheet using the selected configuration parameters.