Exporting Text Files
Gnumeric can export worksheets to structured text files. To create a text file one chooses the item in the submenu of the menu. In the dialog, one specifies the file name, and selects the folder in which to save it, retaining the file format "Text export (configurable)". Upon clicking Save the Text Export druid appears which permits the configuration of file structure characteristics.
The steps involved in the text export druid are:
- Launch the Text export druid using, in the item in the submenu of the retaining the "Text export (configurable)" file format type.
- Select the worksheets to include in the exported file.
- Configure the order of the worksheets for the exported file.
- Go to the second panel.
- Select the line termination character.
- Select the value separating character or character sequence
- Select when values should be surrounded by a text indicating character.
- Select the character or sequence to use to indicate a text field.
- Configure the character encoding to use for the file.
- Select how to handle unknown characters.
- Select whether to preserve the format of the cell contents.
- Click on the button to export the file.
14.6.1. The Components of the Text Export Druid
The Text Export druid consists of two panels. The first panel allows the user to select the worksheets included in the export and their order. The second panel allows the user to configure the structuring elements, the line delimiting characters, value separating characters, text indicating characters, and file encoding.
- 14.6.1.1. The first panel of the Text Export Druid.
- 14.6.1.2. The second panel of the Text Export Druid.
14.6.1.1. The first panel of the Text Export Druid.
The first panel of the Text Export Druid allows users to set the file encoding, to determine the character sequences used to separate lines, configure the type of structuring being used and select the lines of the file to import.
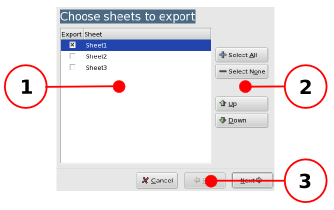
The different components of the first panel of the Text Export druid with each component labeled with a callout.
The purpose of each labeled component in Figure 14-8 is explained below:
- 1 - The worksheet selection area.
-
This area allows the user to select the worksheets to be included in the file. By default, only the top most sheet will have its checkbox checked and be included in the export. The user can add sheets by clicking in their checkboxes to set the check marks.
- 2 - The worksheet selection and ordering buttons.
-
The top two buttons allows the user quickly to select or unselect all the worksheets to be included in the export file. The bottom two buttons allow the user to change the order of the worksheets in the file to be exported.
- 3 - The button area.
-
These three buttons allow the user to navigate the druid. The button will dismiss the dialog and return the user to the worksheet. The button is disable since this is the first panel of the druid. The button will dismiss the first panel and bring up the second panel of the druid.
14.6.1.2. The second panel of the Text Export Druid.
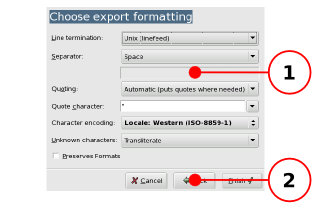
The second panel of the Text Export Druid allows users to select the line termination character, configure the value separating character, select the text indicating character and set the character encoding.
The different components of the second panel of the Text Export druid with each component labeled with a callout.
The purpose of each labeled component in Figure 14-9 is explained below:
- 1 - The export characteristic menu buttons.
-
These drop down menus provide to set the different configuration parameters for the exported file. The various menus are as follows.
.-
Line Delimiting Character-
This button allows the user to activate a drop down list from which to select the character used to indicate the end of a line and beginning of the next. The three commonly used alternatives are provided. See Section 14.4.1.2 ― Line break delimiters for more details.
-
Value Separating Character-
This button allows the user to select a character to use as a value separator. The "Custom" type will active the text entry area to allow the user to determine a particular character or character sequence to use to delimit data values. See Section 14.4.1.3 ― Data Structuring Strategies for more details.
-
Value Separating Character entry area-
This entry area allows the user to define explicitly the character or character sequence which should be used to separate each value field on every line. This area is only active if the "Custom" type has been selected from the list in the button above.
-
The Text Field Delimiter activity setting-
This button activates a list with three choices for the use of text field delimiters. Text fields can be delimited only where needed, meaning that the quote characters will only be used if the value contains the character used as a separator or a space. Alternatively the text field separators can be used around all values or never applied. See Section 14.4.1.3 ― Data Structuring Strategies for more details.
-
The Text Field Delimiter character entry area and list-
This area can be used as a text entry area to type the character to use to delimit text fields. Alternatively, three pre-selected characters, double quotes or single quotes, can be selected from the drop down list which appears by clicking on the downward pointing arrow to the right of the text field.
-
File encoding selection button-
This button allows the user to set the encoding scheme to use for the file. By default, Gnumeric selects the encoding scheme used by the locale of the user. See Section 14.4.1.1 ― Character Encodings for more details.
-
The unknown character handling setting button-
This button selects whether to escape or transliterate characters which Gnumeric does not recognize.
-
The format preservation checkbox-
This checkbox sets whether to preserve the number formats for formatted values.
-
- 2 - The button area.
-
These three buttons allow the user to navigate the druid. The button will dismiss the dialog and return the user to the worksheet. The button is disable since this is the first panel of the druid. The button will dismiss the druid and cause the file to be saved using the selected options.