Glade Interface Designer Manual
1. Introduction
The Glade interface designer enables you to create and edit user interface designs for GTK+ applications.
The GTK+ library provides an extensive collection of user interface building blocks such as text boxes, dialogue labels, numeric entries, check boxes, and menus. These building blocks are called widgets. You can use Glade to place widgets in a GUI. Glade allows you to modify the layout and properties of these widgets. You can also use Glade to add connections between widgets and application source code.
The user interfaces designed in Glade are stored in an XML format, enabling easy integration with external tools. You can use the libglade library to dynamically create GUIs from the XML description.
2. Getting Started
- 2.1. To Start Glade
- 2.2. When You Start Glade
2.1. To Start Glade
You can start Glade in the following ways:
- menu
-
Choose .
- Command line
-
To start Glade from a command line, type the following command, then press Return: glade-3
2.2. When You Start Glade
When you start Glade, the following window is displayed.
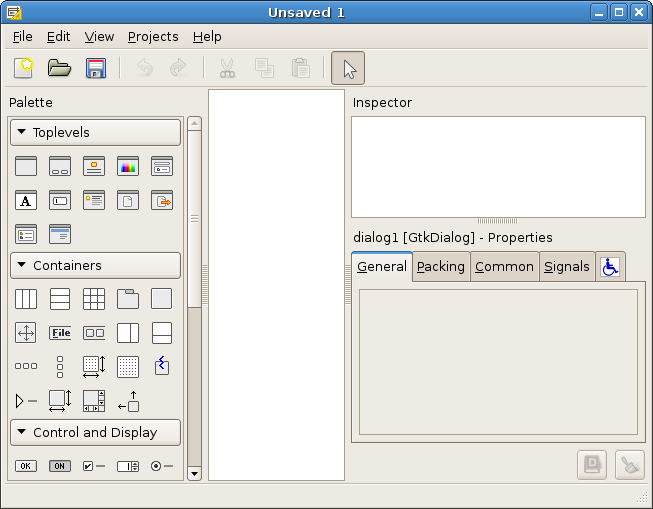
The Glade window contains the following elements:
- Menubar
-
The menus on the menubar contain all of the commands you need to work with files in Glade.
- Toolbar
-
The toolbar contains a subset of the commands that you can access from the menubar.
- Design Area
-
The design area is where a user interface can be visually edited.
- Palette
-
The palette contains the widgets that can be used to build a user interface.
- Inspector
-
The inspector displays information about the widgets in a project.
- Property Editor
-
The property editor is used to manipulate the properties of widgets, as well as adding connections to source code.
- Status bar
-
The status bar displays information about current Glade activity and contextual information about the menu items.
3. Working with Projects
- 3.1. Creating a New Project
- 3.2. Opening a Project
- 3.3. Saving a Project
3.1. Creating a New Project
To create a new project, choose . The application displays a new blank project in the Glade window.
4. Working with Widgets
4.1. To Select Widgets From the Palette Window
You can work with the widgets in the Palette window in the following ways:
- Selection mode
-
To use selection mode, click on the Selector arrow. The pointer changes to an arrow to indicate that selection mode is active. In this mode, you use the mouse to select widgets in your project. You can then use the Properties window to edit the properties of the widgets.
You can also use the widget context menu to select a widget. Right-click on a widget to open the widget context menu.
You can add multiple widgets of a specific type from the Palette to your project by holding down the Control key when you select a widget. You need to click on the Selector arrow or another widget in the Palette to return to normal mode.
- Widget placement mode
-
To use widget placement mode, select a widget in the Palette window. When you select most widgets, the pointer changes to a pointer-plus-cross. You can then place the widget inside containers, top-level widgets, and so on. After you place a widget, the mode returns to selection mode.
- Top-level placement mode
-
To use top level placement mode, select a defined top-level widget in the Palette window. When you select a top-level widget in the Palette window, the widget appears immediately on your desktop. You can then edit the widget. After you select a top-level widget, the mode returns to selection mode.
4.2. To Organise Widgets In Your Project
You use widget containers, or boxes, to layout and organise widgets in your project window. You can choose the following widget containers from the Palette window:
- Horizontal Box
- Vertical Box
- Table
- Fixed Positions
- Horizontal Button Box
- Vertical Button Box
- Horizontal Panes
- Vertical Panes
- Notebook
- Frame
- Scrolled Window
- Viewport
You can nest boxes to create complex layout structures. When you create horizontal and vertical boxes, Glade asks you how many rows or columns to create initially, though rows and columns can easily be added or deleted later.
When you have created all the boxes you require, you can add specific widgets like labels, buttons, and more complicated widgets into the boxes. Notice that Glade packs widgets into the layout which eliminates a lot of tedious work. The use of boxes enables windows to change size to accommodate different size labels in different languages when the application is localised.
4.3. To Place a Widget on the Clipboard
To remove a widget from a parent and place the widget on the clipboard, select the widget then choose .
4.4. To Copy a Widget to the Clipboard
To copy a widget to the clipboard, select the widget then choose . The original widget remains attached to the parent.
4.5. To Paste a Widget From the Clipboard Into Your Project
To paste a widget that exists on the clipboard into your project, choose .
All widgets must have a unique name within Glade. If you cut a widget, and then paste the widget into your project, then the widget and all of the children of the widget keep their original names. If you copy a widget, or paste the widget multiple times into your project, then Glade generates new names for the widget copies.
5. About Glade
Glade is maintained by the Glade developers and GNOME community volunteers. To find more information about Glade, please visit the Glade Web site.
To report a bug or make a suggestion regarding this application or this manual, you can submit them using bugzilla.
Another excellent source of information are the Glade user and developer mailing lists. In addition to subscribing, you might also want to browse the list archives, available via these same links.
This program is distributed under the terms of the GNU General Public license as published by the Free Software Foundation; either version 2 of the License, or (at your option) any later version. A copy of this license can be found at this link, or in the file COPYING included with the source code of this program.