Defining Names
Names are labels with a meaning defined in the spreadsheet or by Gnumeric. Names can be defined for a whole workbook or for just a single worksheet. A name can refer to a numeric value, a string, a range of cells, or a formula. A name can be used wherever its meaning could otherwise be used.
A name is a sequence of letters, digits, and underscore characters, beginning with a letter or underscore. A name cannot look like a cell identifier. For example, "D7" is not a permitted name, while "D_7" and "_D7" are permitted.
To define a name or modify the definition of an existing name:
- If you wish to define or modify a name for use within a single worksheet and it is not the current worksheet, click on the appropriate worksheet tab at the bottom of the Gnumeric window.
- Open the dialog by choosing from the Section 4.2.4 ― Edit Menu.
- Use the dialog to modify the defined names as desired. When your changes are complete, click on to close the dialog.
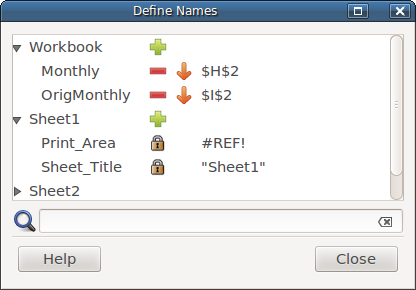
The dialog lists the names defined in the workbook, organized into two or more groups corresponding to the workbook, the active sheet, and the inactive sheets, if any. When the dialog is opened, only the names defined for the workbook and the active sheet are visible; the definitions for any inactive sheets are collapsed into a single line for each, identified by the sheet name. The definitions for the workbook or a sheet can be exposed or hidden by clicking on the arrow at the left end of the workbook or sheet line.
The second column of the dialog can show one of three icons. To define a new name, click on the plus sign in the row for the workbook or the active worksheet. Names defined under a worksheet name are visible only on that worksheet. Names defined for the workbook are visible to any worksheet that does not have its own definition of the name. Names are created as "<new-name>", which must be changed before the definition can be used. Click on the new line to select it, then click on the name field and type the new name, followed by the Enter key. When you press Enter, the name is fixed. Only its value can then be changed.
If the second column shows a minus sign, the line is for a user-defined name. Click on the minus sign to delete the definition of the name. If the second column shows a padlock icon, the definition is created automatically and cannot be modified from this dialog.
For user-defined names, the third column of the dialog contains a downward- or upward-pointing arrow. Click on the arrow to move the definition down to the worksheet or up to the workbook. This operation is not permitted if the moved definition would replace a name already defined for the destination. To do such a replacement, first delete the name in the destination, then move the definition.
The last column of the dialog shows the value defined for the name. When a new name is created, this field is initialized with an absolute reference to the currently selected cells. To modify a definition, click on the value field and edit it as desired, then press the Enter key. To define a string value, enclose it in quotation marks, for example, 'string one' or "string two". To specify a range of cells, use absolute references. Relative references change in meaning depending on the cell where they are used, which is unlikely to produce your intended result. You can define a name as a cell or range of cells by clearing its existing definition, if any, and then selecting the desired cell or cells on the cell grid. You can switch worksheets prior to selecting cells. The dialog continues to modify names defined for the workbook or the worksheet that was displayed when the dialog was opened. A reference created by selection in the dialog includes the worksheet name and uses absolute cell coordinates. That is, a selection would look like "Sheet1!$A$1:$B$24".
Below the display of defined names is a filter box. If the workbook or sheet contains many defined names, you can see a subset of the names by typing a partial name in the filter box and pressing Enter. All names that do not contain the entered string are omitted from the display. Differences of case are ignored. For example, if “real” were entered in the filter box, names such as "Real_Value" and "Surreal" would be displayed. When you press Enter in the filter box, contexts that contain no matching names are automatically collapsed. You may later need to manually expand the workbook line, for example, if the filter string is changed. If the line for the workbook or a worksheet begins with a right-pointing arrow, it contains names that pass the filter. Clicking on the arrow will change it to a downward-pointing arrow and make the names visible. To see all the defined names, clear the filter by clicking on the button at the right end of the filter box.
In addition to the names defined by the user, Gnumeric has some pre-defined names for useful elements:
- Sheet_Title: The name of the current sheet.
- Print_Area: The range of cells set as the sheet's print area; undefined if print area is not set.